What to do when it's really cluckin' cold out!
- Heather Barclay
- Feb 4, 2025
- 9 min read

Did you hear the one about the hen who only laid eggs in the winter? She was... no spring chicken!
This morning when I woke up, it was a real temp of -13, with a feels-like temp of about -30. That's not just a little nippy, that's COLD. For us, that means hand warmers, electric blankets, whiskey, a lot of whining, etc. But what does it mean for our girls? Luckily, there are a bunch of really easy adjustments/additions that will make a ton of difference and make the ladies quite comfortable.
A few little frosty fowl fun facts:

Chickens are actually a lot heartier than you may think - when they fluff up their feathers which create little air pockets that trap heat and it turns them into self-heating machines. If you have provided them a space free from drafts, they can easily keep themselves warm enough to survive upwards (downwards?) of -20 degrees Fahrenheit. (FYI, I tried to replicate this effect by not shaving my legs all winter but it really just wasn't the same thing!)
While I don't want to hurt their feelings, Chickens have some pretty ugly scaley little feet. A little lotion wouldn't kill them! But those scales actually ALSO help trap heat and keep those skinny little chicken legs warm. As long as they have try places to walk, and have places to go roost up off of the ground, they can keep their tootsies nice and warm too. Also, don't fret if suddenly all of your girls seem to have lost one leg - it's still there, they've just tucked it all the way up into their fluffy feather heat pockets to warm it up a bit.
Strong women support other women... When your girls snuggle up together, not only do their fluffy warm air pockets keep THEM warm, they can keep the air immediately around them around 35/40 degrees. When you're looking at getting a coop and chickens, you want to be sure you provide enough space for them that they don't get stressed, but I would argue TOO much space - especially in parts of the world that get much colder in the winter - is worse than not enough. If their inside space is too large, it's harder for them to stay warm. Some ways you can compensate for this include getting tarps or insulation boards and doing a "drop ceiling" for the winter to reduce the amount of space during the coldest winter days.
Excuse me, this is a coop, not a KFC! The case against coop heaters.
While a lot of people think throwing a little heater into the coop is the nice thing to do on a cold day, there are several reasons why I'd advise against it unless we are talking about something really apocalyptically cold. Firstly, we've already talked about how well chickens self-heat. Secondly, many coop-heaters add a fire risk, and the thought of my poor girls getting stuck in a coop fire is just heart breaking. Lastly, if you get your girls accustomed to a nice toasty coop during a cold snap, should you lose power, that abrupt drop in temperature poses a far greater risk to their health and comfort than if they'd just been allowed to adjust to the cold temps.
To help add heat to the coop, skip the supplemental heating source, and go for a "deep litter" method instead. This means making sure your coop starts with a nice deep layer of clean shavings, and then periodically you go through and "turn" it with a stall rake or pitchfork and add more clean shavings. The chicken droppings and shavings start to compost and that puts off a lot of extra heat. Making sure you're turning it and adding fresh dry shavings helps keep the moisture down, and at the end of the winter, you can do a nice spring cleaning and take the entire shebang and put into a compost pile to use as soil amendment for your garden!
Food as fuel.
Something we could all do well to remember is that while some foods are for fun, food's primary role is fuel. There will likely be a lot of future posts that talk about the importance of food for different chicken needs, but for now we'll focus on feeding and fueling for cold weather.
One really interesting thing about chickens is their crop, or craw - depending on where you live. The crop is the little "bag" at the bottom of their throat, before their stomach. It's essentially a storage pouch for food. Think about it like a to-go box... it's the middle of the night, you're feeling a bit peckish, and you remember OH! I have leftovers! Chickens can store food in their "to-go box" and take snacks out of it to further chew up and break down and send along to their stomach for digestion. The crop is also really useful in extreme temps - in both directions. In the summer, I will often give the girls frozen berries which they'll tuck away in their crop and in addition to being a snack for later, it'll help warm them up.
The digestion process in general is also a great heat generator. There are certain foods you can feed your flock that help them crank out even more heat. Some great winter foods include oatmeal, cracked corn, scratch grains, meal worms, fermented feed, and sprouted grains. Make sure to provide plenty of grit during the winter as well to help them break the foods down, as it's harder for them to get naturally occurring grit (that's a nice way of saying "eat dirt") in the winter when the ground is largely frozen.
Lastly, do NOT forget how important water is! Invest in a good heated water base. The base can go right on the ground, and your metal waterer sits right on top. This morning when I went out to check on things, their waterer hadn't iced over, and it was about -10 degrees out! I've posted a link directly to the base I use. I can't speak highly enough about this little monster! Prior to switching to this method, I'd tried a heated waterer that was misery to refill so I abandoned that. Then I started just bringing a bucket of screaming hot water out every morning and filling their regular plastic waterer, but if they didn't drink all of it, you had to deal with the giant ice puck at the bottom, which was an added layer of fu... um. FUN to deal with in the mornings.
Recipes fit for a hen
Sprouted Grains
Sprouting grains are a delicious addition to your girl's feed in the winter. When everything is frozen, sprouting your own grains allows your flock to do a little bit of faux foraging. I like to get a really good sprout mat going, and then drop some meal

worms or other grubs/bugs in it so they get to scratch around to eat the sprouts and find bugs (aka chicken crack). Not only is it delicious and nutritious, it is a form of enrichment, because mental stimulation is really important during the winter when there's less for them to do.
To get started, I like to get a couple xl metal pans. You can get the disposable foil pans, or pick up a couple cheap deep cookie sheets. Whichever you get, you'll want to poke/drill holes in one of the sheets/pans to allow for drainage. The second pan will be the catch pan for draining. Next, you'll want to decide on a grain. You have many options, but I like picking up a bag of these wheat berries. And that's it!
Drill holes in one pan/sheet - make sure the holes are smaller than the grains you're using!
Spread layer of grain of choice on the pan with the holes. You don't want it to be too deep, but you want it to be it to be a thick enough layer that when you spread it out, you can't see any pan peeking through.
Put the pan with holes into the second pan.
Fill the pan with enough water to fully cover all of the grain. Let it soak for 6-8 hours. I like to do this right before bed and let it just soak overnight.
After you've let the grain soak, bring both pans to the sink, lift up that top pan and let it drain off. Dump all of the water out of the bottom pan. Give that top pan a little shake to make sure you've gotten the majority of the water out - you want it to be damp, but you don't want standing water.
Put the grain pan back into the drip pan, then carefully spread the grain evenly across the bottom of the pan. Once it's spread out, cover with a towel and set aside.
For the first couple days, fully rinse the grain, spread it back out carefully, drain the excess off, and re-cover the pans. You will start to see wee little sprouts as soon as day three.
Once I start to see sprouts, I like to be a bit more ginger when I'm wetting them down. I like to let them start to really form a thick tangled root mat, so I'll either use a big spray bottle and spray them down like that, or I'll put the sink faucet on the "spray" mode at a very light volume and carefully wet it all down, and drain.
By about day 6 or 7, you'll have a really nice thick mat. The roots should have all tangled together and the top should have sprouts of an inch or two tall.
When it is as sprouted as you want, you can either put the full "sprout mat" out in one chunk, or you can cut it up into squares and distribute across the run. I like to sprinkle some "chicken crack" in there too for a little extra fun and protein. Give it a gentle shake when you're pulling it out and you'll have some "old maids" left that haven't sprouted yet, or have only sprouted a little - I leave those in the pan and add the fresh grain to that and start the whole process all over again. You can get a couple pans going at once so you always have a rotating stock of fresh sprouts for them!
Fermented feed
Fermenting your regular chicken feed takes very little effort, and very little time, but saves time and provides added nutritional value to your flock. Only a total bird brain would opt not to try this!
The fermentation process produces lactic acid which promotes the growth of probiotics which help boost their immune systems and improve their digestion.
Fermentation makes the proteins in the feed easier to digest.
The wild yeasts and cultures from the fermentation process help kill mold spores that can sometimes be found in feed.
More generally, the fermentation process breaks down all of the ingredients in a way that allows your girls to digest and absorb the nutrients more quickly and easily.
In addition to the health benefits for your flock, there are added benefits to YOU too!
Fermented feed can help your girls lay bigger and better quality eggs.
The benefits of the probiotics mean a strong immune system, which helps the fight off disease so you have a strong, healthy flock.
Fermented feed is more easily and efficiently digested so more of it is actually "used" vs turned into waste. Not only will they produce less waste, it will also be dryer which is so important in the winter, as moisture in the coop leads to higher risk of frostbite on their combs.
And fermenting feed effectively doubles your feed content! If you typically feed your flock an 18lb bag of food a week, you can expect to only need to ferment and feed 9 lbs!
To ferment the feed, you just need a couple buckets or glass jars, a spoon long enough to reach the bottom of your container of choice, and your regular chicken pellets! The process takes about four days from start to being ready to feed so keep that in mind when you're deciding how much to ferment at a time. I like to have two buckets going at a time in different stages of ready so I always have some freshly fermented feed from them in the morning.
start by determining how much feed you plan to ferment. Plan to ferment 40-50% less feed than you'd normally feed dry.
put the dry feed into your container of choice and fill with water - enough to a little more than cover. I like to use warm water because my house is on the cooler side and the heat speeds the process along.
give the feed a good stir through, and let it sit and soak up. You'll likely want to add a bit more water in an hour or so. The feed should be fully soaked up and will look like a bucket of mush. It should be wet enough to be able to stir - you don't want a soup but you don't want clumpy dry feed.
I go through and give it a good stir through anywhere from 2-4 times a day for the next couple days. You'll start to see bubbles, and it'll get a nice yeasty smell to it.
On or around day four, you should be ready to serve! I typically do twice as much as I need and feed half on day four, and the other half on day five. That way I only need to have two buckets going at a time and I have enough feed for a fresh batch every AM.
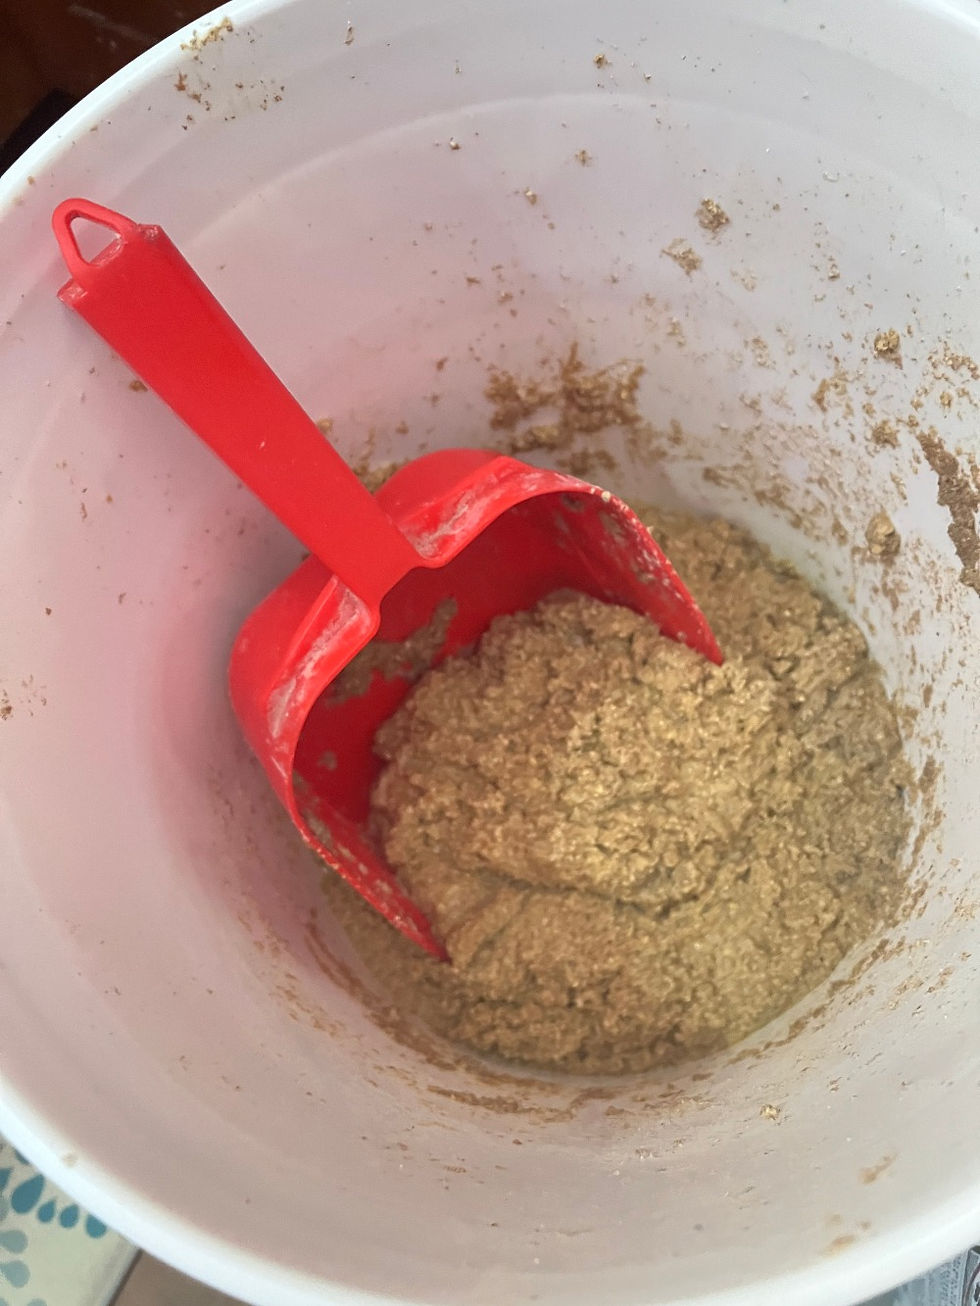
Once it's ready to serve, I use little feed pans like these, and I have three of them on the ground in the run and put a big red scoop of the fermented feed in each pan.
Baby, it's cold outside... but your chickens are just fine. Keep your coop nice and dry and draft free, keep their water source in the liquid form and OUT of the coop, supplement their food with heat generating snacks, keep them nice and healthy by supplementing or replacing their dry feed with fermented feed, give them some enrichment to keep their little brains busy during the boring winters, and you'll have a nice health, hearty flock that will reward you with some really cluckin' delicious eggs!
Peace, love, and double yolks,,
-Heather


Comments